
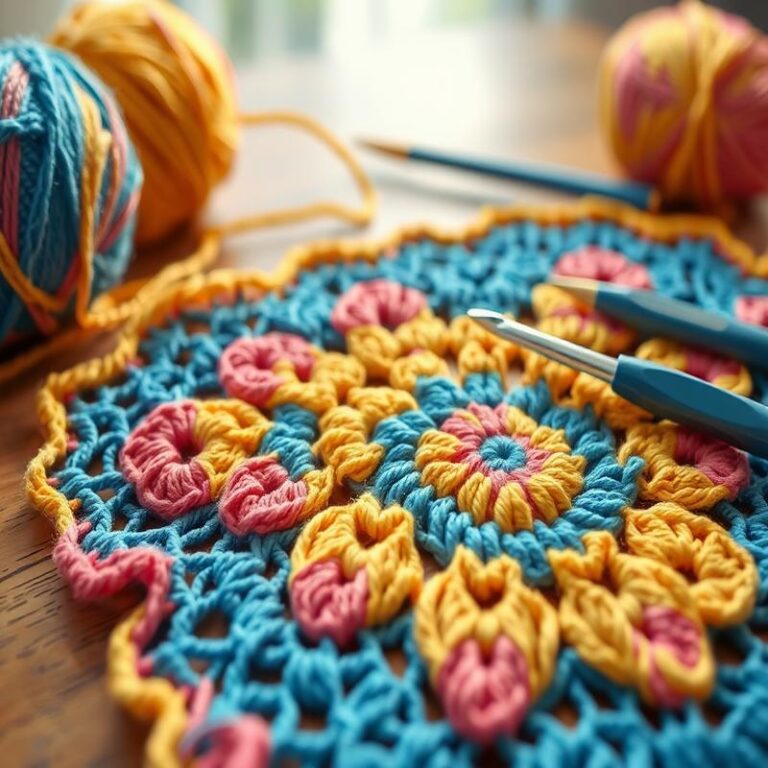
crochet granny square
Crochet granny squares are a beloved staple in the world of crochet, and for good reason. They’re vibrant, versatile, and a fantastic way to use up leftover yarn. If you’ve ever looked at a cozy blanket or a trendy bag and thought, “Wow, I wish I could make that!” — granny squares are the perfect starting point. They’re not just charming; they also allow you to play with color and pattern in a fun way.
To get started, you’ll want to familiarize yourself with some basic crochet stitches. These are essential for creating the squares. If you’re new to crochet, checking out a crochet stitches tutorial can be incredibly helpful. It’s all about building your skill set, and granny squares are a forgiving project where mistakes can often be worked into the design.
If you’re excited about different patterns, I recommend browsing through crochet stitch patterns for inspiration. Before you know it, you’ll have a beautiful patchwork of granny squares that reflect your unique style!
1. What is a Crochet Granny Square?
A crochet granny square is a classic patchwork motif commonly used in crochet projects.
These squares are traditionally crafted in rounds and are known for their vibrant colors and patterns.
Granny squares can vary in size but typically feature a basic square shape, making them versatile for numerous projects, including blankets, bags, and garments.
The beauty of granny squares lies in their modular design, allowing crocheters to join multiple squares to create larger items.
One of the defining characteristics of a granny square is its striking visual appeal, created by alternating colors and stitches.
“Granny squares are a canvas for creativity, enabling crocheters to express their artistic flair.”
Structure of a Granny Square
A standard granny square consists of a series of double crochet stitches worked into chains, with each round adding another layer to the design.
Typically, a granny square begins with a central loop of yarn, and as each subsequent round is added, the square expands outward.
The main components of a granny square include:
- Center ring: The starting point, usually made with a chain or slip knot.
- Rounds: Each layer builds upon the last, often involving double or triple crochet stitches.
- Joining: Squares can be connected through various methods, including whip stitching or slip stitching.
The technical aspects of creating a granny square can be adapted based on personal preferences, making them welcoming to both beginners and experienced crafters.
The combination of simplicity in creation and endless possibilities in design allows granny squares to hold a special place in the hearts of crocheters worldwide.
As one of the most iconic elements of crochet, granny squares not only provide a beautiful aesthetic but also offer practical applications for warm and cozy creations.
History of the Granny Square

Throughout its long and storied history, the granny square has woven itself into the fabric of crochet culture, blending tradition with creativity.
Origins in the 19th Century
The granny square is believed to have originated in the 19th century during a time when home crafts gained popularity among women as a form of artistic expression and practical creation.
- Initially connected with functional items like blankets and throws.
- Served as a way to use up scrap yarn, encouraged resourcefulness.
- Commonly found in cozy home environments, especially in Europe.
Evolution Over Time
By the early 20th century, granny squares began appearing in various publications, increasing their visibility and popularity among crafters.
Notable developments include:
– The introduction of colorful arrangements, allowing for personal expression.
– A shift toward making garments and accessories, such as vests and bags.
The granny square also became a symbol of the Arts and Crafts movement, representing handmade craftsmanship and individual artistry.
Granny Squares in Popular Culture
In the latter half of the 20th century, granny squares found their place in popular culture, particularly during the hippie movement, where they became associated with bohemian fashion and home decor.
“The granny square is more than just a piece of craft; it’s a generational symbol conveying love, unity, and creativity.”
Modern Revival
Today, granny squares experience a resurgence thanks to movements emphasizing sustainability and handmade goods.
Craft enthusiasts reimagine the simple square, transforming it into modern art pieces, apparel, and cozy furnishings.
The granny square continues to inspire new generations of crocheters, proving its timeless appeal and adaptability in a constantly evolving craft scene.
Basic Stitches Used in Granny Squares
To create a crochet granny square, understanding the basic stitches is essential.
Granny squares are typically constructed using a few foundational crochet stitches.
These stitches are not only fundamental but also versatile, allowing for various styles and designs.
Key Stitches
The most common stitches used in granny squares include:
- Chain Stitch (ch): This is the foundational stitch for many crochet patterns that creates a base from which other stitches are worked.
- Slip Stitch (sl st): Used to join stitches or rounds, slip stitches help to blend transitions neatly.
- Double Crochet (dc): The primary stitch in most granny square patterns, it creates height and a lacy effect. This stitch involves yarn overs and is worked into the stitch of a previous row.
- Single Crochet (sc): Occasionally used in granny squares, this stitch provides a tighter and denser texture.
Working in Rounds
Granny squares are predominantly worked in rounds.
Beginners can learn how to start by making a slipknot and creating a magic ring.
This technique allows multiple stitches to be worked into a single ring, forming the center of the square.
Once the center is established, you’ll typically alternate between chain stitches and double crochet stitches to create the square’s characteristic clusters.
Exploring More Stitches
As you become comfortable with the basics, you can explore variations.
For additional learning on crochet stitches, resources like Basic Crochet Stitches or Crochet Stitches Guide can offer detailed insights.
Experimenting with different stitches can lead to unique and creative designs.
Understanding these basic stitches not only enhances your granny square-making skills but also opens up the possibility for numerous crochet projects.
4. Materials Needed for Crochet Granny Squares
Creating crochet granny squares is a delightful craft that requires a minimal but essential set of materials. Here’s a list of the necessary supplies you’ll need to get started.
Yarn
Choosing the right yarn is crucial for your granny squares. Most commonly, you will find:
- Acrylic yarn: Affordable and available in various colors, making it a popular choice for beginners.
- Cotton yarn: Offers a cleaner stitch definition, perfect for detailed patterns and projects requiring a firmer structure.
- Wool yarn: Adds warmth and can be used for cozy projects, though it may be a bit pricier and require special care when washing.
Crochet Hook
The size of the crochet hook you use will depend on the yarn weight. Common hook sizes range from G (4.0 mm) to J (6.0 mm) for most worsted weight yarns.
Scissors
A sturdy pair of scissors is essential for snipping yarn ends and trimming any mistakes made during the crocheting process.
Yarn Needle
Using a yarn needle (also called a tapestry needle) will help in weaving in the loose ends after finishing your squares. This step ensures that your granny squares not only look beautiful but are also durable.
Measuring Tape
Having a measuring tape is helpful for ensuring that your granny squares are uniform in size, especially if you plan to join them together in a larger project.
Optional Supplies
Depending on your personal preference, you may consider additional materials, such as:
- Stitch markers: Useful for marking the beginning of a round or specific stitches in your pattern.
- Blocking mats: Useful for shaping your granny squares into perfect squares after finishing.
Once you have gathered your materials, you’re ready to dive into the whimsical world of crochet granny squares. Happy crocheting!
5. Step-by-Step Guide to Making a Basic Granny Square
To create a fundamental granny square, follow these straightforward instructions designed for beginners and experienced crocheters alike.
Step 1: Gather Your Materials
Before you start, ensure you have the necessary materials at hand:
- Yarn (preferably worsted weight)
- Crochet hook (size H/8 or 5mm is commonly used)
- Scissors
- Tapestry needle for weaving in ends
Step 2: Create the Foundation Ring
Begin by making a slipknot and chaining 4. Join this into a ring by slip stitching into the first chain. This forms the center from which your granny square will build.
Step 3: First Round
Chain 3 (this counts as your first double crochet), and then work 2 double crochets into the ring. Next, chain 2, which will form a corner.
- Repeat the following: 3 double crochets, chain 2
- Do this 3 more times for a total of 4 corner spaces.
Finish by joining with a slip stitch to the top of the starting chain 3. You should have 4 corner spaces.
Step 4: Second Round
For the second round, slip stitch to the first chain-2 space. Chain 3, and then work 2 double crochets into the same space. Chain 2, and in the next corner space, repeat the sequence of 3 double crochets, chain 2.
- Complete this for each of the 4 corners.
Close this round with a slip stitch to the top of the chain-3.
Step 5: Continue Rounds
To add more rounds, repeat the process of slip-stitching to the corner spaces and increasing the number of double crochets in the corners. Continue until the granny square reaches your desired size.
Step 6: Finish Your Granny Square
After achieving your desired size, secure the last stitch with a slip stitch. Cut the yarn, leaving a tail
Different Types of Granny Squares
Granny squares come in a wide variety of types, each offering unique styles and patterns that cater to different preferences and creativity.
Classic Granny Square
The classic granny square is the most recognized form and consists of a simple arrangement of double crochet stitches in clusters.
- A traditional pattern usually consists of three double crochets in each corner.
- It is often designed with vibrant, contrasting colors, creating a beautiful tapestry effect.
Solid Granny Square
As the name implies, the solid granny square is dense and filled with stitches, lacking the open spaces typical of classic squares.
- This style is ideal for projects needing added warmth, such as blankets and scarves.
- It uses only one color or can incorporate a gradient effect for visual interest.
Lacy Granny Square
The lacy granny square features an airy design, making it lightweight and delicate.
- It often utilizes chain stitches and open spaces within the patterns for a more elegant look.
- These squares can be great for summer garments or decorative shawls.
Join-as-You-Go Granny Square
This type simplifies the task of assembling squares by allowing crafters to crochet them together as they go, eliminating the need to join them later.
- It results in less sewing and easier handling of the project.
- This method can create a seamless look that is beautiful and practical.
Variegated Granny Square
Using yarn that has multiple colors mixed together, variegated granny squares create stunning patterns automatically as you crochet.
- The colors blend and change throughout the square, producing unique outcomes.
- This type is particularly engaging for beginner crafters as it requires minimal planning for color placement.
With these
Creative Ways to Use Granny Squares in Projects
Granny squares are not just confined to traditional blankets; their versatility allows for countless creative applications in various crochet projects.
1. Blankets and Afghans
Granny squares are most commonly used to create vibrant and unique blankets or afghans.
- Join multiple squares to form larger projects.
- Experiment with different color combinations for a personal touch.
2. Home Décor
In addition to functional items, granny squares can also be used for beautiful home décor.
- Table runners: Sew or crochet a collection of granny squares together to create a colorful table runner.
- Pillows: Use granny squares to crochet pillow covers, adding an artistic accent to your living room.
3. Accessories
Granny squares can also be fashioned into various accessories.
- Bags: Create tote bags or purses by combining squares. They can be practical and stylish.
- Hats and scarves: Combine squares to make unique hats or scarves, perfect for colder months.
4. Clothing Items
Crocheted clothing has a charming yet casual appeal.
- Shawls: Use granny squares to construct a lovely shawl that is both eye-catching and functional.
- Vests: Experiment with squares to create a unique vest or poncho.
5. Gift Ideas
Granny squares make thoughtful and personalized gifts.
- Gifts for babies: Create colorful baby blankets or toys out of soft yarn.
- Special occasions: Use granny squares to make unique items for birthdays, anniversaries, or holidays.
With so many creative possibilities, granny squares can elevate your crochet projects from simple to extraordinary. Embrace the art of granny squares to showcase your creativity and craftsmanship!
Common Mistakes to Avoid When Crocheting Granny Squares
When crocheting granny squares, even seasoned crafters can encounter challenges.
By knowing the common pitfalls, you can ensure a smoother crafting experience and achieve the best results.
1. Inconsistent Tension
Inconsistent tension can lead to uneven squares.
It’s essential to maintain a steady grip on the yarn throughout your project.
- Practice with different yarns to find your comfort zone.
- Regularly check your tension as you work.
2. Skipping Stitch Counts
Each round typically involves specific stitch counts.
Neglecting to follow these can distort the shape of your granny square.
Always double-check the pattern instructions.
3. Not Counting Rounds
Many crocheters forget to count rounds, leading to mismatched squares.
Keeping track of how many rounds you’ve completed will help maintain uniformity.
You can use a simple method:
- Mark completed rounds with stitch markers.
- Take regular photographic progress updates for visual confirmation.
4. Ignoring Color Changes
Color changes can enhance your design but require precision.
When changing colors, some common mistakes include:
- Leaving too long a tail, which can create bulk.
- Not weaving in ends properly, leading to unraveling.
5. Neglecting Blocking
Skipping the blocking process can leave your granny squares curled and misshapen.
To block your granny squares:
- Soak in lukewarm water.
- Shape them on a flat surface, pinning the corners.
This simple step ensures that your finished squares look clean and professional.
6. Using the Wrong Hook Size
Using a hook size that is too small or too large can distort your squares.
Always refer to the pattern for the recommended hook size and gauge swatch advice.
By being mindful of these common mistakes, you can improve your crocheting skills and create beautiful granny squares with ease.
Tips for Finishing and Joining Granny Squares
When it comes to creating a beautiful project with granny squares, the finishing and joining process plays a crucial role in achieving a polished and professional look. Here are some essential tips to ensure your squares come together seamlessly:
Finishing Your Granny Squares
Before joining, it’s important to finish your granny squares properly.
- Weaving in Ends: Use a yarn needle to weave in the loose ends of your yarn. This helps to secure the stitches and gives a neat appearance.
- Blocking: Consider blocking your squares to achieve uniform shapes. Wet blocking or steam blocking can enhance the appearance by evening out the stitches.
- Ensure Consistency: Make sure all your squares are the same size for easier joining.
Methods for Joining Granny Squares
There are various methods to join granny squares, each providing a distinct finish.
| Joining Method | Description |
|---|---|
| Slip Stitch Join | A smooth, flat join that is almost invisible. |
| Whip Stitch Join | A quick method that provides a slightly raised seam. |
| Join As You Go | This technique allows you to join squares as you crochet the last round, reducing assembly work. |
Final Touches
After joining your squares, consider the following:
- Adding Borders: A simple border can unify the overall look of your project.
- Trimming Excess Yarn: Ensure there are no long tails protruding from the edges.
- Inspecting for Mistakes: Take a moment to recheck any joins or missed
1. What is a Crochet Granny Square?
A crochet granny square is a small, typically square piece of crochet work that is made using a series of colorful yarn and stitches.
These squares are characterized by their unique patterns, which often incorporate various colors that can create beautiful, intricate designs.
Initially popularized in the 20th century, granny squares are now a beloved motif in the crochet community.
Each square usually consists of a few basic elements, allowing for a straightforward and enjoyable crafting experience.
The basic structure is built upon a central ring, from which multiple rounds of stitches radiate outward.
Granny squares can be made in a variety of sizes and styles, from the classic double crochet blocks to more intricate variations with lace or textured designs.
Their flexibility allows crafters to experiment with different yarn types, colors, and stitch combinations, making each square unique.
The beauty of granny squares lies in their versatility; once completed, they can be easily joined together to create larger items such as blankets, shawls, or bags.
They are appealing not only for their aesthetic value but also for the ease with which they can be transported and worked on in various settings.
Many crafters enjoy the meditative quality of crocheting granny squares, as they provide an opportunity for relaxation and creativity.
Additionally, granny squares can be adapted for various skill levels, making them an excellent choice for both beginners and advanced crocheters alike.
The simplicity and charm of a crochet granny square make it a timeless staple in the world of crochet, continually inspiring new generations of fiber artists.
conclusion
In wrapping up our journey with the crochet granny square, I hope you found it as enjoyable and rewarding as I do.
These little squares can spark so much creativity and bring your crochet projects to life.
If you’re just starting out, don’t forget to check out resources like How to Crochet for Absolute Beginners for a solid foundation.
As you become more comfortable, you might want to explore various patterns and styles available at LoveCrafts.
It’s amazing what you can create with just a few basic techniques. If you’re looking for more crochet stitches, Mama in a Stitch has great guides to help you expand your skills.
Lastly, I would love to hear your thoughts and experiences with crochet granny squares!
Feel free to share in the comments below and don’t forget to follow us on social media for more crochet inspiration!
“`html
Frequently Asked Questions
What is a crochet granny square?
A crochet granny square is a classic square motif made using basic crochet stitches, often in bold colors and patterns. It is typically worked in rounds and can be combined to create various projects such as blankets, bags, and clothing.
How do I start crocheting a granny square?
To start crocheting a granny square, you need yarn, a crochet hook, and basic crochet skills. Begin with a slip knot followed by a chain stitch, then build the square using double crochet stitches in clusters to create the classic granny square look.
What materials do I need for a granny square?
You will need yarn (preferably medium-weight), a crochet hook that matches the yarn size, and scissors. A yarn needle is also helpful for weaving in loose ends.
Can I use different types of yarn for granny squares?
Yes, you can use different types of yarn to create unique textures and patterns in your granny squares. Just be mindful of the yarn weight and the hook size to ensure even stitches.
How do I join granny squares together?
Granny squares can be joined using various methods such as slip stitch, whip stitch, or crochet joins. Choose the method that best fits your finished project and desired aesthetics.
What are some popular projects made from granny squares?
Popular projects made from granny squares include blankets, throws, bags, hats, and even clothing items like shawls and vests. The possibilities are endless!
Can beginners crochet granny squares?
Absolutely! Granny squares are perfect for beginners as they only require basic crochet skills such as
Similar Posts
chain stitch crochet
Discover the art of chain stitch crochet with this comprehensive guide. Learn techniques and patterns to enhance your skills. Start creating beautiful projects today!

crochet bobble stitch
Discover the crochet bobble stitch with our detailed guide. Learn how to create this fun texture, perfect for adding depth to your projects. Start today!
crochet ghost pattern
Discover a fun crochet ghost pattern perfect for Halloween decorations. Follow our step-by-step guide to create this charming and spooky masterpiece. Start crocheting today!

puff stitch crochet hat
Discover how to create a stunning puff stitch crochet hat with our easy step-by-step tutorial. Get started on your cozy project today and impress everyone!

wave stitch crochet
Explore the art of wave stitch crochet with our detailed tutorial. Discover tips and techniques to create beautiful, wavy patterns in your projects. Get started today!

free crochet pattern for
Discover a delightful free crochet pattern perfect for all skill levels. Follow our easy step-by-step guide and start creating beautiful projects today!